Edit (10/24/2008) - I will leave this post here for awhile, but it will be moving to my new site
There are a lot of ways to customize your avatar in Second Life. You can play around with shapes pretty easily, but skins, clothes, and hair take some talent. Tats, on the other hand, are super easy to make. To do this, you'll need some sort of graphics editing software that has Alpha channels. Photoshop is great, if you can afford it. I can't. Actually, I could . . . but there are a lot of other things I'd rather spend my money on. I use the GIMP . . . cause it's free!
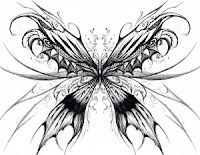 Anyway, here's how I made the tat. First, I found an image I liked. I found this one on DeviantArt. I don't know how copyright laws apply to this sort of thing, but I'm not planning on selling the tattoo in Second Life, so I think it's ok. Try to find an image that's flat on a white background. Don't use a picture of an actual tattoo on an actual person, unless your some sort of super Gimp Goddess and can figure out how to separate the tat from the body and flatten it out.
 If you just upload this image into Second Life as it is and try to make a tattoo out of it, it'll look like a big white patch on your back with the image on the white patch instead of your skin. We don't want that. So, open the image in the Gimp. What we need to do is replace all the white parts with transparency. If the image is grayscale (mine was), this is easy. Go the the Filters menu, chose the Colors submenu, and click on "Color to Alpha". A window will pop up showing a preview of what's about to happen to the image. If it looks right, just click on "Ok". All the white parts should be replaced by a checkerboard pattern. This pattern is how the Gimp represents transparency. If you're trying to make a checkerboard tattoo, this would probably make things confusing :)
 So now you should see something like the image to the left. Save it as a native Gimp file. I'm not going to explain how to do that, cause I'm assuming you know how to save stuff, or can figure it out for yourself. Now, you'll need the clothing texture templates from Second Life for this next part. Rather than explain where to get those and how to use them, I'm just going to refer you to the tutorial on Natalia Zelmanov's blog here and here. I'll wait here while you go read that . . .
By the way, Natalia has several really good tutorials on all kinds of things in Second Life, as well as a great list of things to do and places to see. And she posts a new blog almost every day.
Ok, I'm going to assume you've now got the clothing templates and know the basics about how to use them. Open the Upper Body Template in the Gimp. I like to add a white background layer to this to make everything easier to see, but it's not necessary. Next, open the tattoo image you saved earlier as a new layer. Just click on "Open as Layer" from the File menu and find your image and select it. Now you'll need to resize it and position it where you want it to be on your body. Make sure the new layer you just created is the active layer when you do this. I decided my image would make a nice back piece, so I scaled it down a bit, and centered it on the
 back of the upper body template, using all the lines as a guide. Zoom in if you need to to get the image exactly where you want the tattoo to be. Once you upload the image into Second Life, you won't be able to reposition it. This is what mine looked like once I had it where I wanted it. Now, turn off all the layers except the one with your tattoo image on it.
Update - 4/28/08
Due to several questions and requests, I realized I needed to add a little detail here about how to turn off the other layers. First of all, make sure you have a window open in GIMP called "Layers, Channels, Paths". GIMP's window system can be a bit confusing to people new to it, and a lot of times this window gets closed before you understand what it's for. I know I closed it when I first started using GIMP. Unfortunately, when you close it, it does not automatically re-open the next time you start GIMP. If you do not have this window, go to File .. Dialogs .. Create New Dock .. Layers, Channels, Paths to reopen it.
Once you have that open, you should see a list of all the layers in your file. To the left of the name of each layer is a symbol that looks like an eyeball. This means that layer is on. Click on the eyeball to turn a layer off. You need to turn off every layer except the one with your tattoo on it. See the figures below for a before and after of what the layers window should look like.

We need to save this image as a Targa file so we can upload it into SL. Just choose "Save As" from the File menu. Name the file whatever you want and choose where you want to save it. Click on the little plus sign next to where it says "Select By File Type (By Extension", scroll down and pick "TarGA image". Then click the Save button. A window will pop up with a bunch of words on it. Ignore them. Just click the button that says "Export". Then another window will pop up. Click on "Ok".
Now we can upload the image into Second Life and make a tattoo out of it. Log into Second Life, and upload the TarGA image you just saved from the Gimp. This will cost you 10L, which is about 3 or 4 cents in US$. Use the preview as upper body option before you click on the Upload button so you don't waste Lindens if it doesn't look right.
 Next, edit your appearance. You'll have to create a new piece of clothing for the tattoo. Unfortunately, you can't use the tattoo layers on the skin if you're wearing a decent skin, because these are already used for the body shading and makeup. I just created a new undershirt, because I wasn't already wearing one. The shirt and jacket layers will also work. You might want to make undershirt, shirt, and jacket versions of you tat so you can wear it with different outfits. Once you've created the new undershirt (or shirt or jacket), click on the Fabric square. Browse through your textures folder until you find the image you uploaded and select it for the fabric. Because of the transparency (Alpha channell) in your image, the only thing that should show on your new clothing is the tattoo. Now save it, close the appearance window, and go show off your ink!
565 comments:
«Oldest ‹Older 601 – 565 of 565Post a Comment