Showing posts with label GIMP. Show all posts

Saturday, August 4, 2007

Vertcal Fabric Folds in GIMP

I was playing around with the Gimp the other day, and stumbled across a really simple way to make a fabric texture with vertical folds in it. This is really easy. When you finish, you should end up with something like this.
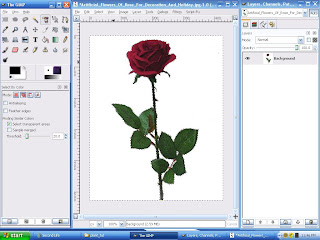
Ok, so start the Gimp, and create a new image. I usually start with 1024x1024 images, and then shrink them to 512 before uploading to Second Life, but you could start with 512x512 for this texture. Start with an image with a white background. I think any background color will work, but I always start with white.

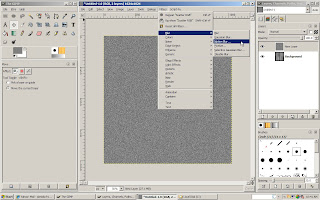
First, we're going to render some clouds. Yes, I said clouds. Go to the Filter menu, then Render . . . Clouds . . . Solid Noise. This is just a tool in the Gimp to produce a randomized gray scale pattern.

A new window will pop up with a bunch of options in it. Set the "X size" to the maximum value, 16, and the "Y size" to the minimum, 0.1. Also make sure the Randomize and Tileable boxes are checked. Don't check the Turbulent box, it won't look like fabric folds. This basically generates tall skinny clouds, I suppose, which conveniently look like fabric folds. Click the OK button.

You can just stop here and use this as is, if you want. But I wanted to add a bit of texture to fabric, and some color. I added texture using a technique I leaned here. First, create a new layer and fill it with gray (RGB (128,128,128) or 808080). Then go to Filters . . . Noise . . . Scatter RGB.

Again, you'll get a window with a bunch of options. Set them like this:
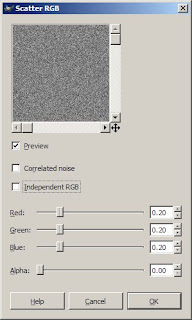
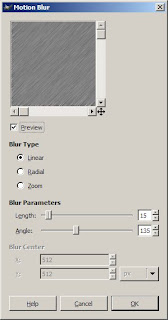
Click on Ok. Next go to Filters . . . Blur . . . Motion Blur.
And, another pop up. Set the options here like this:

Click on Ok. Now, we're going to make this pattern follow the fabric folds we made earlier by displacing this layer. Go to Filters . . . Map . . . Displace. What this filter actually does, if you care, is shift the pixels left, right, up, and down depending on the gray scale value of another layer. This will make it look like the texture is folded the same way the fabric layer is.

Anyway, you'll get another pop up to set options. Set them like this:

Make sure the layers selected in the drop downs is the original layer you made with the clouds filter (the fabric folds). Mine was called Background because I got lazy and didn't rename it something that made sense. Click on Ok. Next set the Mode for this layer to overlay. The texture we made is subtle, but it's there and adds some nice detail I think.

Ok, now we add some color. This is one of those things that can be done several different ways. It's a matter of preference, mostly, but I like to use the Colorize tool. Go to Layer . . . Colors . . . Colorize.

Another pop up, you know the drill by now.

Play with these sliders to get whatever color you want. I have developed a bit of a scary liking for purple lately, so I moved the sliders around till I got a purple I liked. But go with whatever color you want. Click on ok, then merge the layers. I forgot to get a screenshot of this, but right click on the top layer in the Layers window, and select Merge Down. You should now have an image very much like the one at the start of this tutorial.
I uploaded this texture into Second Life and used it to make curtains! I kinda like them.

Friday, June 8, 2007

Making a Simple Plant

Plants are everywhere in Second Life, from the free Linden made plants everyone can place to the beautiful creations in Svarga. The complex plant life in Svarga takes some serious building skills, but it's not very difficult to make a simple, texture based plant. Done well, these can look very realistic, especially at a distance. Done poorly, they stick out like a sore green thumb. I have seen a surprising number that were done poorly, including some you have to spend your hard earned Lindens to buy. Look at the picture below. Can you tell the difference between these two roses?

Now, I didn't spend a tremendous amount of time on either of these, so neither looks all that impressive. But this is just a tutorial, and I wanted to illustrate a couple of common pitfalls. Both of these roses were made starting from the same image. The rose on the left has two problems. First, notice the whitish, translucent haze around the edges. These are the edges of the prims onto which I mapped the image of the rose. These hazy edges don't appear on the rose on the right. Second, and this is kind of hard to see here, but the is a fine white line outlining the leaves, stem, and petals of the rose on the left. Again, they don't appear on the rose on the right. This tutorial will explain what caused these problems and how to avoid them using the GIMP.

Here's the image I started with. This works best if you start with a picture of a plant on a white background. If a part of the plant has white in it, such as the flower petals,you're going to have to modify this technique a little. Try using the Magic Wand selection tool instead of the Color Selection tool as I'm about to do.


First, right click on the layer in the Layers window and select "Add Alpha Channel". Next, click on the "Select Regions by Color" button in the Gimp toolbox. For the image I used, I got the best result by setting the threshold at 20. Now, click anywhere on the white background part of the image. This will select every part of the image that has a color value within 20 percent of the color value of the pixel you clicked. Next, press Ctrl-k to clear (delete) the selection. Poof! All the white background disappears leaving only the rose against the checkerboard. Remember from the tattoo tutorial that the checkerboard is how the Gimp represents transparency.


However, we now have a problem. Again this is hard to see in the picture above, but look what we see if we zoom in.

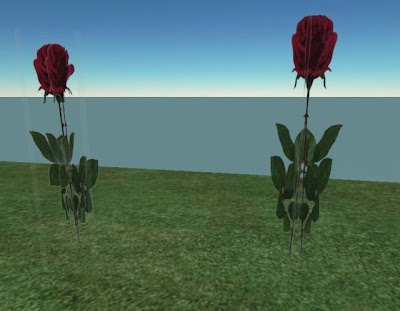
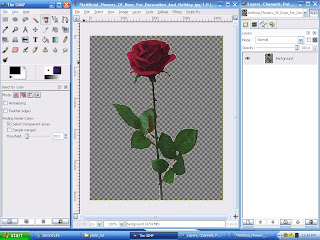
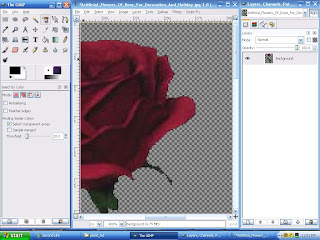
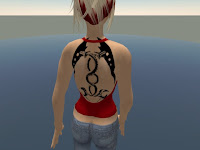
See that white line around the rose petals? This is the white line I mentioned earlier that we could see in the final rose in Second Life. I'm not an expert on graphics, but I assume this is caused because the pixels right along the border between the rose and the white background aren't within 20 percent of the color value of the background. So they didn't get selected when we deleted the background. The good news is we can easily fix this! There are several ways to do this, but here's what has worked best for me. Undo every step back to the part where the white background is selected, but not yet deleted. Now, from the Select menu, click Grow Selection. Make sure it says 1 pixel in the window that pops up, and click on OK. This may be obvious, but this expands the selection by exactly one pixel.

Now, delete the selection as before by pressing Ctrl-k. Now zoom in and you should see this.

Yay! No white line. Save the image as a Targa file. If you don't remember how to do this, go back to the tattoo tutorial.

Start Second Life and upload the image. For the rest of this, I'm going to assume you know the basics of making prims and applying textures in Second Life. If you don't, go through the basic building tutorials at the Ivory Tower of Primitives, or check out the tutorials on Natalia Zelmanov's blog. Make sure you're somewhere you're allowed to build, and rez a cube. Apply the image of the rose (or whatever plant you uploaded) to the front and back faces of the cube.

Now, we want the other four faces of the cube (don't forget the bottom) to be transparent. You could just apply the blank texture to these faces, and then use the transparency slider in the texture tab. However, this will introduce the first problem I mentioned with the rose on the left way back at the start of the tutorial, the white hazy edge outlining the cube itself. The reason for this is that the transparency slider only goes up to 90%. You can't make it completely transparent. Thus, the white haze. This has to be the most common mistake I've seen with plants in Second Life. Again, this has an easy fix.

This doesn't apply just to making plants If you're going to build very much of anything in Second Life, sooner or later you're going to need to make the entire face of a prim 100% transparent. To do this, you need a fully transparent texture. You could make your own using the Gimp. In fact, you can probably figure that one out on your own, but it will cost you 10L to upload. Why pay that to upload nothing . . . literally. Go back over to Natalia's blog. She has a fully transparent texture as a freebie in her store in Second Life. Once you have the fully transparent texture, apply it just like you would any texture to the other four faces of your cube. Then edit the size of the cube to make it as thin as you can. Voila! You have made a plant. Oh, one other thing you should do is copy this cube, put it in the same X and Y location as the first cube, rotate it 90°, and link the two cubes together. This way, you can see the plant from any angle. Happy planting!

Tuesday, May 29, 2007

Windlight

Just a quick post to say that I downloaded the new First Look Viewer today to check out the new Windlight feature . . . and it is amazing. I tried to go to Svarga to take some snapshots to show here, but some guy there wouldn't leave me alone. It figures. Usually, I would like to meet more people in world and no one says boo to me. Tonight I wanted to be left alone. So I went to Washtown and took two quick snapshots. One n the new viewer with WindLight, another from the same location in the regular viewer.
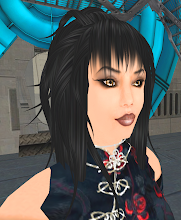
Oh, I also updated the earlier tattoo tutorial blog. The method I had originally worked fine, but I figured out a small improvement.
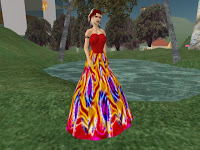
Friday, May 18, 2007

Funky Fractal Dress

I made a dress I really like, although most people will probably think it's a little . . . well, loud I guess. I was messing around with fractal patterns in Gimp, and came up with a pattern I thought would make a good dress. You be the judge.

Friday, May 11, 2007

Tattoo Crazy in Second Life

I've always loved tattoos. I have two in RL, and I'm wanting to get another one as soon as I figure out what I want and where I want it. I think they are an amazing art form. The only problem with them is that if you get one and don't like it, you're kinda stuck or in for some expensive cosmetic procedures to remove it.

Enter the magic of Second Life! You can tattoo your entire body if you want to and go hang out at a club, showing off your body art to friends and strangers. Then zip off to a business meeting (I've heard people do real business in Second Life anyway), and remove your tattoo in seconds. Get a tattoo you don't like? Not a problem, just take it off as easy as you can take off your shoes.

I really like the tattoo I made yesterday, so I decided to try making another one. This one was more complicated, because I started with the photograph on the left. I had to play around with the image in Gimp quite a bit to turn this into a tattoo, but after a lot of trial and error (thank God for CTRL-Z!), I finally got something that I thought would work. I didn't write down all the steps I went through, and I sure don't remember them, so I thought I'd just show you the final result.


Wednesday, May 9, 2007

Making a Second Life Tattoo Using the GIMP

Edit (10/24/2008) - I will leave this post here for awhile, but it will be moving to my new site

There are a lot of ways to customize your avatar in Second Life. You can play around with shapes pretty easily, but skins, clothes, and hair take some talent. Tats, on the other hand, are super easy to make. To do this, you'll need some sort of graphics editing software that has Alpha channels. Photoshop is great, if you can afford it. I can't. Actually, I could . . . but there are a lot of other things I'd rather spend my money on. I use the GIMP . . . cause it's free!

Anyway, here's how I made the tat. First, I found an image I liked. I found this one on DeviantArt. I don't know how copyright laws apply to this sort of thing, but I'm not planning on selling the tattoo in Second Life, so I think it's ok. Try to find an image that's flat on a white background. Don't use a picture of an actual tattoo on an actual person, unless your some sort of super Gimp Goddess and can figure out how to separate the tat from the body and flatten it out.

If you just upload this image into Second Life as it is and try to make a tattoo out of it, it'll look like a big white patch on your back with the image on the white patch instead of your skin. We don't want that. So, open the image in the Gimp. What we need to do is replace all the white parts with transparency. If the image is grayscale (mine was), this is easy. Go the the Filters menu, chose the Colors submenu, and click on "Color to Alpha". A window will pop up showing a preview of what's about to happen to the image. If it looks right, just click on "Ok". All the white parts should be replaced by a checkerboard pattern. This pattern is how the Gimp represents transparency. If you're trying to make a checkerboard tattoo, this would probably make things confusing :)


So now you should see something like the image to the left. Save it as a native Gimp file. I'm not going to explain how to do that, cause I'm assuming you know how to save stuff, or can figure it out for yourself. Now, you'll need the clothing texture templates from Second Life for this next part. Rather than explain where to get those and how to use them, I'm just going to refer you to the tutorial on Natalia Zelmanov's blog here and here. I'll wait here while you go read that . . .

By the way, Natalia has several really good tutorials on all kinds of things in Second Life, as well as a great list of things to do and places to see. And she posts a new blog almost every day.

Ok, I'm going to assume you've now got the clothing templates and know the basics about how to use them. Open the Upper Body Template in the Gimp. I like to add a white background layer to this to make everything easier to see, but it's not necessary. Next, open the tattoo image you saved earlier as a new layer. Just click on "Open as Layer" from the File menu and find your image and select it. Now you'll need to resize it and position it where you want it to be on your body. Make sure the new layer you just created is the active layer when you do this. I decided my image would make a nice back piece, so I scaled it down a bit, and centered it on the back of the upper body template, using all the lines as a guide. Zoom in if you need to to get the image exactly where you want the tattoo to be. Once you upload the image into Second Life, you won't be able to reposition it. This is what mine looked like once I had it where I wanted it. Now, turn off all the layers except the one with your tattoo image on it.

Update - 4/28/08

Due to several questions and requests, I realized I needed to add a little detail here about how to turn off the other layers. First of all, make sure you have a window open in GIMP called "Layers, Channels, Paths". GIMP's window system can be a bit confusing to people new to it, and a lot of times this window gets closed before you understand what it's for. I know I closed it when I first started using GIMP. Unfortunately, when you close it, it does not automatically re-open the next time you start GIMP. If you do not have this window, go to File .. Dialogs .. Create New Dock .. Layers, Channels, Paths to reopen it.

Once you have that open, you should see a list of all the layers in your file. To the left of the name of each layer is a symbol that looks like an eyeball. This means that layer is on. Click on the eyeball to turn a layer off. You need to turn off every layer except the one with your tattoo on it. See the figures below for a before and after of what the layers window should look like.


We need to save this image as a Targa file so we can upload it into SL. Just choose "Save As" from the File menu. Name the file whatever you want and choose where you want to save it. Click on the little plus sign next to where it says "Select By File Type (By Extension", scroll down and pick "TarGA image". Then click the Save button. A window will pop up with a bunch of words on it. Ignore them. Just click the button that says "Export". Then another window will pop up. Click on "Ok".

Now we can upload the image into Second Life and make a tattoo out of it. Log into Second Life, and upload the TarGA image you just saved from the Gimp. This will cost you 10L, which is about 3 or 4 cents in US$. Use the preview as upper body option before you click on the Upload button so you don't waste Lindens if it doesn't look right.

Next, edit your appearance. You'll have to create a new piece of clothing for the tattoo. Unfortunately, you can't use the tattoo layers on the skin if you're wearing a decent skin, because these are already used for the body shading and makeup. I just created a new undershirt, because I wasn't already wearing one. The shirt and jacket layers will also work. You might want to make undershirt, shirt, and jacket versions of you tat so you can wear it with different outfits. Once you've created the new undershirt (or shirt or jacket), click on the Fabric square. Browse through your textures folder until you find the image you uploaded and select it for the fabric. Because of the transparency (Alpha channell) in your image, the only thing that should show on your new clothing is the tattoo. Now save it, close the appearance window, and go show off your ink!