Ok, so start the Gimp, and create a new image. I usually start with 1024x1024 images, and then shrink them to 512 before uploading to Second Life, but you could start with 512x512 for this texture. Start with an image with a white background. I think any background color will work, but I always start with white.
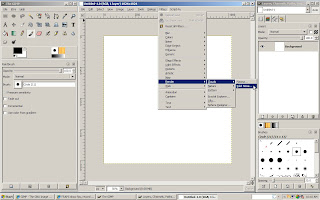
First, we're going to render some clouds. Yes, I said clouds. Go to the Filter menu, then Render . . . Clouds . . . Solid Noise. This is just a tool in the Gimp to produce a randomized gray scale pattern.
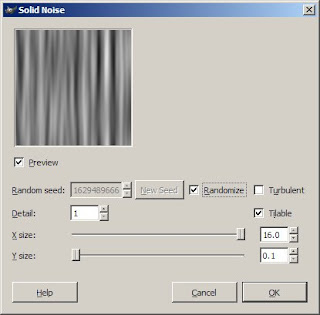
A new window will pop up with a bunch of options in it. Set the "X size" to the maximum value, 16, and the "Y size" to the minimum, 0.1. Also make sure the Randomize and Tileable boxes are checked. Don't check the Turbulent box, it won't look like fabric folds. This basically generates tall skinny clouds, I suppose, which conveniently look like fabric folds. Click the OK button.
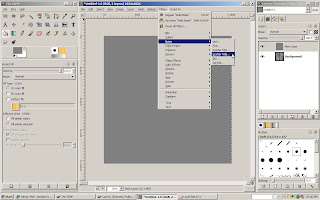
You can just stop here and use this as is, if you want. But I wanted to add a bit of texture to fabric, and some color. I added texture using a technique I leaned here. First, create a new layer and fill it with gray (RGB (128,128,128) or 808080). Then go to Filters . . . Noise . . . Scatter RGB.
Again, you'll get a window with a bunch of options. Set them like this: 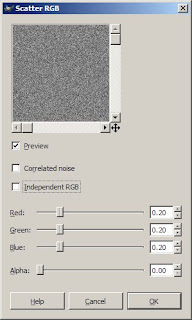
Click on Ok. Next go to Filters . . . Blur . . . Motion Blur.
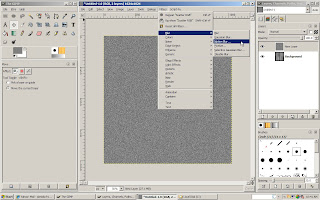

Click on Ok. Next go to Filters . . . Blur . . . Motion Blur.

And, another pop up. Set the options here like this:
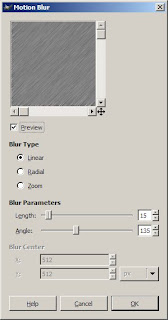
Click on Ok. Now, we're going to make this pattern follow the fabric folds we made earlier by displacing this layer. Go to Filters . . . Map . . . Displace. What this filter actually does, if you care, is shift the pixels left, right, up, and down depending on the gray scale value of another layer. This will make it look like the texture is folded the same way the fabric layer is.

Click on Ok. Now, we're going to make this pattern follow the fabric folds we made earlier by displacing this layer. Go to Filters . . . Map . . . Displace. What this filter actually does, if you care, is shift the pixels left, right, up, and down depending on the gray scale value of another layer. This will make it look like the texture is folded the same way the fabric layer is.
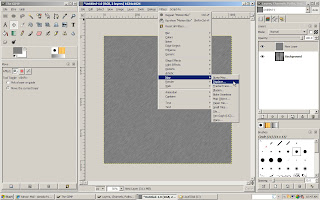
Anyway, you'll get another pop up to set options. Set them like this:
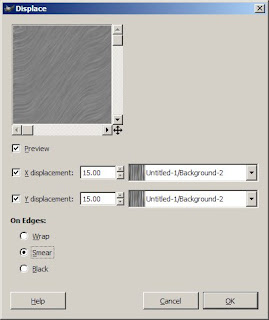
Make sure the layers selected in the drop downs is the original layer you made with the clouds filter (the fabric folds). Mine was called Background because I got lazy and didn't rename it something that made sense. Click on Ok. Next set the Mode for this layer to overlay. The texture we made is subtle, but it's there and adds some nice detail I think.
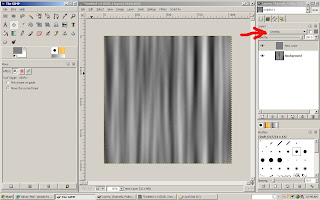
Ok, now we add some color. This is one of those things that can be done several different ways. It's a matter of preference, mostly, but I like to use the Colorize tool. Go to Layer . . . Colors . . . Colorize.
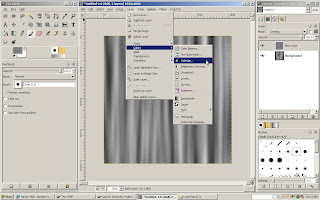
Another pop up, you know the drill by now.
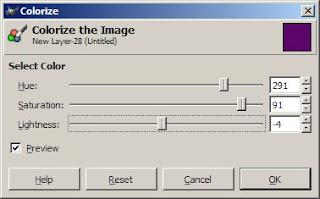
Play with these sliders to get whatever color you want. I have developed a bit of a scary liking for purple lately, so I moved the sliders around till I got a purple I liked. But go with whatever color you want. Click on ok, then merge the layers. I forgot to get a screenshot of this, but right click on the top layer in the Layers window, and select Merge Down. You should now have an image very much like the one at the start of this tutorial.
I uploaded this texture into Second Life and used it to make curtains! I kinda like them.


12 comments:
Very nice! Thank you for sharing this, I'm always searching for different ways to make textures :).
Cool tutorial.. just downloaded GIMP.. looks like it can do a lot.
Great Dani!! Many thanks for the tutorial!
Thank you!
This is awesome, but i'm new to gimp. How do you set the layer mode to overlay(I have gimp 2.but its pretty muchthe same...
thx do you have anymore gimp tuts? I'd love to design some clothing but its hard to find gimp tuts for that.
If you do please email me at backslide57@hotmail.com
You rule; this is just what I was looking for...
I don't use Second Life because the graphics card on my PC can't manage it. However, I do play a game/movie-making utility (called "The Movies") which attracts a lot of modders; your tutorial may save me a lot of work with costume textures, if I can only get GIMP to quit crashing so often... *keeps her fingers crossed and prays*
Awesome!!!!!! Imma going to mesh some curtains in the next week and try out the texture....
..On a personal note ever since I started to discover the power of gimp filters I have un-installed PS CS5 on my machines and refuse to go back to PS.
top [url=http://www.001casino.com/]free casino[/url] brake the latest [url=http://www.realcazinoz.com/]free casino bonus[/url] unshackled no deposit reward at the foremost [url=http://www.baywatchcasino.com/]baywatch casino
[/url].
Hi there to every body, it's my first visit of this weblog; this webpage carries remarkable and genuinely fine stuff in favor of visitors.
Here is my blog: book of ra kostenlos spielen deutsch
What's up, just wanted to say, I loved this article. It was practical. Keep on posting!
My blog post ... book of ra download free f�book of ra download f�book of ra download pc
Post a Comment