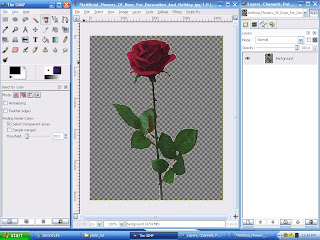
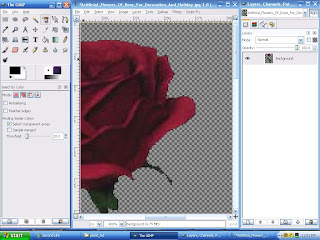
However, we now have a problem. Again this is hard to see in the picture above, but look what we see if we zoom in.
 See that white line around the rose petals? This is the white line I mentioned earlier that we could see in the final rose in Second Life. I'm not an expert on graphics, but I assume this is caused because the pixels right along the border between the rose and the white background aren't within 20 percent of the color value of the background. So they didn't get selected when we deleted the background. The good news is we can easily fix this! There are several ways to do this, but here's what has worked best for me. Undo every step back to the part where the white background is selected, but not yet deleted. Now, from the Select menu, click Grow Selection. Make sure it says 1 pixel in the window that pops up, and click on OK. This may be obvious, but this expands the selection by exactly one pixel.
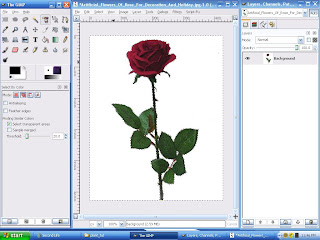
Yay! No white line. Save the image as a Targa file. If you don't remember how to do this, go back to the tattoo tutorial.
Start Second Life and upload the image. For the rest of this, I'm going to assume you know the basics of making prims and applying textures in Second Life. If you don't, go through the basic building tutorials at the Ivory Tower of Primitives, or check out the tutorials on Natalia Zelmanov's blog. Make sure you're somewhere you're allowed to build, and rez a cube. Apply the image of the rose (or whatever plant you uploaded) to the front and back faces of the cube.
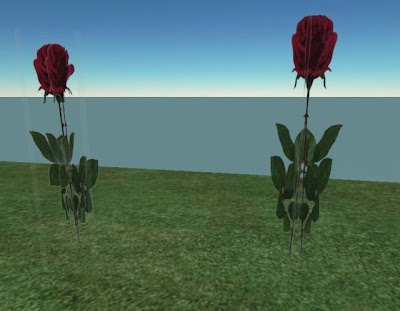
Now, we want the other four faces of the cube (don't forget the bottom) to be transparent. You could just apply the blank texture to these faces, and then use the transparency slider in the texture tab. However, this will introduce the first problem I mentioned with the rose on the left way back at the start of the tutorial, the white hazy edge outlining the cube itself. The reason for this is that the transparency slider only goes up to 90%. You can't make it completely transparent. Thus, the white haze. This has to be the most common mistake I've seen with plants in Second Life. Again, this has an easy fix.
This doesn't apply just to making plants If you're going to build very much of anything in Second Life, sooner or later you're going to need to make the entire face of a prim 100% transparent. To do this, you need a fully transparent texture. You could make your own using the Gimp. In fact, you can probably figure that one out on your own, but it will cost you 10L to upload. Why pay that to upload nothing . . . literally. Go back over to Natalia's blog. She has a fully transparent texture as a freebie in her store in Second Life. Once you have the fully transparent texture, apply it just like you would any texture to the other four faces of your cube. Then edit the size of the cube to make it as thin as you can. Voila! You have made a plant. Oh, one other thing you should do is copy this cube, put it in the same X and Y location as the first cube, rotate it 90°, and link the two cubes together. This way, you can see the plant from any angle. Happy planting!

4 comments:
This was very helpful. Thank you!
This was STILL a huge help, nearly two years later. Using GIMP 2.6, not sure if that makes a difference. Managed to make something happen with a delphinium picture I had.
I am wondering how I can avoid prim flicker with plants I draw that have transparency. Any ideas? I have done a little research and all I found was to make them different amounts of transparency, but when the plant is on one prim this is not possible.
PS thanks for the awesome simple tutorial here! you should do more
Post a Comment