Saturday, August 4, 2007

Vertcal Fabric Folds in GIMP

I was playing around with the Gimp the other day, and stumbled across a really simple way to make a fabric texture with vertical folds in it. This is really easy. When you finish, you should end up with something like this.
Ok, so start the Gimp, and create a new image. I usually start with 1024x1024 images, and then shrink them to 512 before uploading to Second Life, but you could start with 512x512 for this texture. Start with an image with a white background. I think any background color will work, but I always start with white.

First, we're going to render some clouds. Yes, I said clouds. Go to the Filter menu, then Render . . . Clouds . . . Solid Noise. This is just a tool in the Gimp to produce a randomized gray scale pattern.

A new window will pop up with a bunch of options in it. Set the "X size" to the maximum value, 16, and the "Y size" to the minimum, 0.1. Also make sure the Randomize and Tileable boxes are checked. Don't check the Turbulent box, it won't look like fabric folds. This basically generates tall skinny clouds, I suppose, which conveniently look like fabric folds. Click the OK button.

You can just stop here and use this as is, if you want. But I wanted to add a bit of texture to fabric, and some color. I added texture using a technique I leaned here. First, create a new layer and fill it with gray (RGB (128,128,128) or 808080). Then go to Filters . . . Noise . . . Scatter RGB.

Again, you'll get a window with a bunch of options. Set them like this:
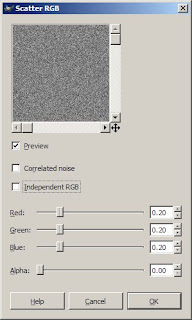
Click on Ok. Next go to Filters . . . Blur . . . Motion Blur.
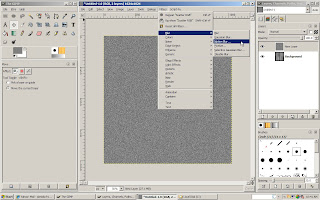
And, another pop up. Set the options here like this:
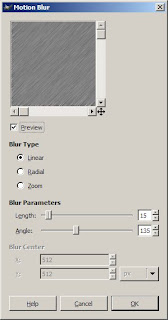
Click on Ok. Now, we're going to make this pattern follow the fabric folds we made earlier by displacing this layer. Go to Filters . . . Map . . . Displace. What this filter actually does, if you care, is shift the pixels left, right, up, and down depending on the gray scale value of another layer. This will make it look like the texture is folded the same way the fabric layer is.

Anyway, you'll get another pop up to set options. Set them like this:

Make sure the layers selected in the drop downs is the original layer you made with the clouds filter (the fabric folds). Mine was called Background because I got lazy and didn't rename it something that made sense. Click on Ok. Next set the Mode for this layer to overlay. The texture we made is subtle, but it's there and adds some nice detail I think.

Ok, now we add some color. This is one of those things that can be done several different ways. It's a matter of preference, mostly, but I like to use the Colorize tool. Go to Layer . . . Colors . . . Colorize.

Another pop up, you know the drill by now.

Play with these sliders to get whatever color you want. I have developed a bit of a scary liking for purple lately, so I moved the sliders around till I got a purple I liked. But go with whatever color you want. Click on ok, then merge the layers. I forgot to get a screenshot of this, but right click on the top layer in the Layers window, and select Merge Down. You should now have an image very much like the one at the start of this tutorial.
I uploaded this texture into Second Life and used it to make curtains! I kinda like them.

Saturday, July 21, 2007

Profiles

One of the first things I do when I meet someone new in Second Life is look at their profile. Why do I do this? Well, because it's a lot faster than playing 20 questions. Unfortunately, a lot of people never fill in their profile, and I have to resort to asking them if they are an animal, vegetable, or mineral. In Second Life, that's not necessarily an odd question :) . Looking a someone's profile can be useful, though, even if they haven't filled it in. All of the groups they belong to will be listed there. For example, say you meet some guy in a sandbox and he asks you to go with him because he has a cool sim to show you. You look at his profile and notice all of the groups he belongs to are Gor related. You can probably safely assume he wants to show you a Gor sim. If that's your thing, by all means follow him. If, on the other hand, a Second Life of perpetual servitude is not your thing, you probably should politely decline his invitation. I am not, by the way, being at all critical of the Goreans. It's not my thing, but I think it's great that people who want to explore that world can.

Anyway, the point is that profiles can be a very useful tool, and you should know how to look at someone else's profile, and how to fill yours in. Looking at someone's profile is very simple. Just right click with your mouse cursor over their avatar. A pie menu will pop up in front of them. On the right side of this menu it will say "Profile". Left click on that and their profile will pop up. Here is me doing that on my friend Heavenly's profile.


Across the top of the profile, you will see several tabs. The first one, 2nd Life, has all the basic information about that avatar in Second Life. You can see how old they are (not in real life, just when the account was created), all the groups they belong to, a picture, and a description of whatever they wanted to say about themselves. The last tab is called "My Notes". Here, you can make notes about that person. Yes, you are entering information on their profile. Well, not really. Only you will see these notes, but they will only show up when you view that avatars pofile. If, for example, someone bothers you in a sandbox after you asked them to leave you alone, you can write in here, "This guy wouldn't leave me alone in blahblah sandbox on July 20, 2007." Then, if you run into Mr. Jerk again a month later and read his profile, your note will be there reminding you what he did.

Ok, now lets fill in our profile. From the edit menu, select "Profile".


By the way, those are my friends Heavenly and Roland in the screenshot. I did get their permission for them to show up on this blog. If you're going to start posting pictures from Second Life on the internet, you should ask people's permission if they're in the picture. That's just good manners, I think. Anyway, your profile will pop up just like the other person's did when you viewed their profile. Only now you can enter information on all the tabs. On the first tab, all you can enter is a description. Write whatever you want here, but remember that anyone you meet in Second Life will be able to read this. Also, this is supposed to be the description of your Second Life, not your first. There's another tab for that. You can also upload a snapshot here. I used a snapshot of myself, but you don't have to.


The second tab is called "Web". If you have a website, or a blog, you can enter the URL for it here. That webpage will then be viewable in your profile. I think this is pretty cool, and I've noticed more people using it lately.


Next is a tab called "Interests". This has a series of check boxes for you to mark what skills you have, and what you would like to do, such as building, scripting, groups, buying, selling, etc.
The next tab is called "Picks". This was intended to be used for showing your favorite places in Second Life. If you click on the "New" button here, a snapsot of your current location will be shown here, with the name of the location to the left. The neat thing is that you can rename this to whatever you want, enter a description for it, and even change the snapsot. Because of this, you can use this tab to show pictures of your friends, you favorite places, cool snapshots you took, etc.

Next, is a tab called "Classified". This is for places classified ads. So, if you're selling a plot of land, selling a dress, or hiring a bartender, you can place an ad for it using this tab.
Next is the "1st Life" tab. This is pretty much like the "2nd Life" tab, except it only has a picture and a description. Again, this is supposed to be about your 1st life. The real you, in other words. My experience has been that most people either leave this blank or put something like "I'll have to get to know you well before I tell you anything about my first life." I think this is a good idea. You need to be very careful about revealing personal infomation here, because everyone in Second Life will be able to see it. Don't put your phone number and address here, in other words. I just left mine blank.
The last tab is the "My Notes" tab. You could put something here, I suppose, but you will be the only one able to see it. Again, I left mine blank.
Well that's all there is to profiles I think. I want to make one last comment, though. For some reason, it has been my experience that more men than women in Second Life fail to fill in their profile. Of course, you can never really be sure what someone's 1st life gender is, but several of my friends have noticed this as well. Guys, do yourselves a favor and fill in your profile. You might even find it more effective at meeting women that "Hey, Baby".

Wednesday, July 18, 2007

I Hate Camping - High School Memories

Well, I haven't posted to this blog in a month. When I last posted, I was starting this "Free Second Life" project. That has turned out to be incredibly boring for me, so I'm giving up on that. I'm sure it would be a worthwhile endeavor for someone, but it was killing my fun in Second Life. All I was really doing was camping, or looking for places to camp. And lately the prices paid for camping have dropped. 2L for 12 minutes seems to be the going rate right now, and that's just not worth it. I would rather spend a few US dollars and go do something fun. Or upload some textures for clothes or tattoos or furniture.

I did, however, promise a quick tutorial on filling out your profile. I will post that tomorrow . . . promise :)

My first life was interesting last weekend. I found out two days ahead of time that my high school reunion was last weekend. Luckily, my hometown is only two hours away from where I live now, so I was able to go in spite of the short notice. I'm still finding it a bit hard to accept that high school was 20 years ago. I was a bit apprehensive about going. I wasn't exactly part of the "in" crowd in high school and I figured that would be mostly who showed up. But I went anyway, because I knew I'd regret it if I didn't.

I wish I could say that I had more fun than I'd had in a long time, but I didn't. It wasn't awful either. I'm very glad I went, and it was good to see some people I hadn't seen in 10 or 20 years (I went to the 10 year reunion too). We got a tour of the high school, which hasn't really changed much. That's pretty amazing, considering the building was built in 1924. Our old principal was there. When I was in high school, he weighed well over 300 lbs. At the time, I doubt any of us thought he would still be alive 20 years later. But he is, and has lost a lot of weight and seems to be pretty healthy.

Most of the classmates I was closest too weren't there, unfortunately. But a few were, and it was cool to see them and meet their husbands and wives and children. I'm still single and always have been, so that felt a bit awkward at times. But I wasn't the only one, so it wasn't too bad. All in all, I'm glad I went. Oh, and they took a vote for most changed since I school. I came in third :) . Next reunion, if I go, I'm sure I'll win that one.

Monday, June 18, 2007

Free Second Life - Days 3 and 4

Ok, after a couple of days acquiring freebies, I decided to try to go earn some Lindens. I might not look like a complete newbie anymore, but I doubt I could make much money as a dancer or an escort. I don't think I want to be a dancer or escort anyway. I don't think there's anything wrong with making money that way, it's just not for me. I'm no good at flirting either, so I don't think I'd make a good dancer or escort anyway.

I can't make any good clothes or other objects to sell yet. You need Lindens to upload the textures, and I don't have any Lindens.

That basically leaves me with one option. Camping. I have to go camping. Crap. I have always hated camping. They hog sim resources, filling up the sim with people doing nothing but sitting. They drive traffic numbers up for malls that may or may not have good quality items for sale. And they don't really pay very much. Honestly, I would really rather save my time, buy a few Lindens on the Lindex, and go do something fun or productive. But . . . that's not the point of this experiment. I want to experience Second Life for free. And for now, at least, that means camping.

Ok, where to go camping. The best way to find camping places is probably to go to the search menu and click on the Popular Places tab. Find one you like and teleport there. I'm not going to tell you which one I went to, because they're all pretty much the same, and I'm not going to advertise for them :) . Once you find a place to camp, look for a pose ball that says "camp". Some places also disguise they're camping as window washing or street sweeping or something like that. Anyway, if it's a pose ball, just right click on it and sit. Most of them will pay you between 2 and 4 Lindens for every 10 minutes you sit there. It doesn't pay as you sit there. It keeps track of how long you've been sitting, and pays you once you stand up. Most of them will also kick you out of the chair if you go into idle. There are supposed to be some anti-idling tools out there, but I haven't found one yet. The more sophisticated camping chairs pop up a window that you have to click on every ten minutes. If you don't click on it, it kicks you out of the chair. This is to prevent someone from camping their avatar while they're not at the computer. I don't know anyway to defeat this.

You also may see some kiosks in some of these camping places that offer Lindens in exchange for taking a survey. I was fearful that these were some kind of scam, but I thought it would be a good idea to try one and write about it here. After trying one, I wouldn't call it a scam, but it's close. It takes you to a website where you can take surveys. These surveys are very clever, and seem mainly geared towards getting your e-mail address in to a bunch of mailing lists. Other surveys are more blatantly about selling you something in return for Lindens. I didn't try these, as that would have broken the rules for this project. I did get paid 91L for one of the surveys I did take, and promptly started getting spam on the e-mail account I used. Luckily, it's one I don't use regularly. I would strongly suggest not getting Lindens using these surveys. Some of them may be legit, but you're almost certain to get more spam. To me, it's not worth it.

After a couple of days of not doing anything other than camp while in Second Life, I had accumulated a whopping 237L. Not exactly a fortune, but everone has to start somewhere. Luckily for me, being homeless in Second Life is no big deal and you don't need to eat.

Tomorrow, I'll go shopping for some cheap stuff and talk about filling out your profile.

Friday, June 15, 2007

Free Second Life - Day 2

Ok, I said I would include a more complete description of how I changed my shape from the newbie shape. Here's what I looked like when I first showed up on Orientation Island.


By the way, I did not take this picture from Orientation Island. I forgot to do that there, and took this one later. But it's exactly how I looked at the very beginning. I have NEWBIE written all over me.

The first thing I did I talked about yesterday. I went freebie shopping. Again, I got most of my free clothes, shoes, and even a few skins, at Free Dove. After trying on a few things, I ended up looking like this.


I didn't like any of the hair I found at Free Dove, but I found this hair with a beanie attached in my Library under the Nightclub Female outfit folder. Not great, but better. Next I wanted to personalize my shape. The shapes you get when you first start aren't bad, but everyone has them in their inventory. If you go around wearing one of these shapes, everyone will know you're new. That can be a good thing if you're needing help. I did have a couple of very nice people offer to help me when I looked like this, so if you really are a newbie, it might be a good idea to spend a day or two looking like a newbie. On the other hand, there are a few less scrupulous people out there who might just be looking for newbies to harass. I didn't encounter this, but like everything in life, be careful.

Ok, modifying your shape. First, right-click somewhere on your avatar. If you are wearing an attachment (like the beanie in my pic above) make sure you don't right-click there. You should see a pie menu pop-up in front of your avatar.


Move your cursor over the pie-menu where it says "Edit Appearance". Left-click there. You'll see another window pop-up and your avatar will spin around a little. This is the Edit Appearance menu.


Here you can change just about everything about your shape. See the blue buttons just to the left of the thumbnail pictures of your avatar? These are all the different parts of your body shape you can modify. Underneath each thumbnail is a slider bar, which lets you modify different parameters for that body part. Play with these, and with the different body parts, and experiment. Your avatar will change immediately to show what these sliders do. Try to make small adjustments. Moving the slider bar all the way to zero or 100 can often result in a bizarre appearance. But maybe you want a bizarre appearance :) . Anyway, when you are happy with your changes, click on the "Save As" button at the bottom of the window, and name the shape something you'll remember. By the way, I took some of these pics at different tomes (cause I forgot to when I was originally modifying my shape) so I'm wearing different hair in some of them. Sorry about that. When I was finished, I looked like this.


If you like this shape, and are too lazy to go through all these steps, I've made it available as a freebie at my not-so-evil twin Salina's Tattoo shop, Purple Monkey Tattoo. Yes, I opened a store on my not-so-free Second Life persona, Salina. I'll blog on that later :)

Wednesday, June 13, 2007

Free Second Life

I first joined Second Life in December 2005. At the time, I couldn't manage my first life, much less take on a second one. I think I logged in only a few times and barely figured out how to move around. Almost a year later I had gotten my real life somewhat in order, and a good friend of mine talked me into giving Second Life another chance. It was because of her that I had signed up originally, and by now she was practically addicted. I couldn't remember my password or anything, so I just created a new account. For some reason, though, I just still couldn't really get into it. By January of 2007, though, I was honestly starting to feel a little left out of an important part of my friend's life. Every time we got together, she'd talk about her SL friends as if I knew them, almost forgetting that I had no idea who she was talking about. Ok, I'll admit it. I was feeling a little jealous :) . Finally, after I discovered that a couple of other friends of ours were also really into Second Life, I decided I needed to give it another chance. I'm really glad I did, because I've found it gives me a creative outlet I've never really had. It's also given me an excuse to learn some really cool software like the Gimp and Blender, and a reason to start a blog.

Anyway, the point of all of this is that I realized the other day that I would do things a lot different if I were starting Second Life now, knowing what I know. I could have saved a few dollars. Quite a few dollars, honestly. Unfortunately, I've already spent that money and I can't get it back. What I can do, however, is help other people avoid some of my mistakes.

So I've decided to try a little experiment. I'm calling it "Free Second Life". I want to see how good of an experience someone can have in Second Life without spending a single penny of real money! Yesterday, I created a new alt account. I did this so that I can make this experiment as realistic as possible. I wanted to start fresh with just the newbie inventory that Linden Labs gives you when you sign up. I'm going to post my progress here, ending with my Linden balance at the end of each day that I post. I do plan on earning some Lindens. You would be extremely limited in hat you could do without them. The rules for this experiment are:

1. I can't purchase any Lindens. I can set up a credit card so that I have payment info on file, but I can't buy any Lindens.
2. I can't transfer any Lindens from any of my other accounts to this one. I'm not giving up my other SL accounts, and I can still spend real money on them. But none of that money can end up in the hands of my Free Second Life account.
3. No begging for Lindens. I suppose this is a valid way to get a few Lindens, but I just can't do it. I've had complete strangers ask me for Lindens before, and it annoys the crap out of me.
4. No accepting of gifts of Lindens from friends of my other alts. I just think that would be cheating.
5. No accepting of of Lindens gifts from people who read this blog.
6. Gifts of clothes, objects, other items, and Lindens freely given to me in world by people in was that don't violate riles 3, 4, or 5 will be accepted. I think this is realistic. I've had people give me gifts before for various reasons, and I don't see a problem with that as long as I'm not going around begging for gifts or Lindens.

I think those rules are enough.

So, I created a new account. My Free Second Life name is Elsbeth McMahon. I wanted Elizabeth, but that name wasn't available with any of the current last names. I chose McMahon because it was the closest thing to my RL last name, McGough. Ok, maybe not that close. But they're both Irish.

I went through Orientation Island like all other newbies. I won't go into details of that here. I think the Orientation Island process is pretty good. The instructions they provide are fairly easy to follow. Once I finished that and got to the mainland, I tried to remember what it was like to be a newbie. To be honest, that wasn't as easy as you'd think. It's very hard to pretend you don't know what you know. At least it was for me. Maybe that's why I haven't been able to get into doing any role playing :) .

I decided the first thing I wanted to do was not look so much like a newbie. I looked pretty awful compared to the beautiful avatars you see on the Second Life home page. To get started, I consulted an expert. Natalia Zelmanov has an excellent guide for newbies on her blog. Following her suggestion, I first went to New Citizens Inc. On her blog, it's called New Citizens Plaza, but they've changed the name since she wrote her guide. When I got there, it was very crowded and extremely laggy. This is, unfortunately, not uncommon for some of the mainland sims. If you are new (or even if you aren't) and find yourself somewhere where everything is taking a long time to rez into view, and you can barely move, try not to get frustrated. Each sim (also known as a region) on the mainland is an area of 65,536 square meters and is hosted on it's own server. Some servers are faster than others, and each can only handle a certain number of people in it at the same time. I think the number is 40. Anyway, crowded sims mean a full server. And this means slow. You have two choices. Be patient and accept that it's going to be slow, or go somewhere else. I have very little patience. I opted to go somewhere else.

I went to Free Dove. I so wish I had known about this place when I really was a newbie. The place is loaded with free clothes, shoes, hair, skins, and a lot of other stuff. It was very crowded, but not laggy. I guess it's on a faster server, I don't know. Anyway, I picked up almost everything there for the taking. A couple of the skins there are actually quite nice. And I was able to find a nice, normal looking casual outfit that didn't make it overly obvious that I was a newbie. I didn't really like any of the hair I got there, though.

Oh, another thing. I think there were some shapes there, but you don't really even need a freebie shape. All of the shapes you can buy (or pick up for free) are created using the slider bars under the Edit Appearance menus. You hopefully remember how to change those from learning about it in Orientation Island. I was able to use these to make my own shape that I think looks quite nice fairly easily. I may post a detailed blog about that tomorrow.

That was pretty much it for day one of Free Second Life for Elsbeth McMahon. My Linden balance at the end of the day was zero.

Friday, June 8, 2007

Making a Simple Plant

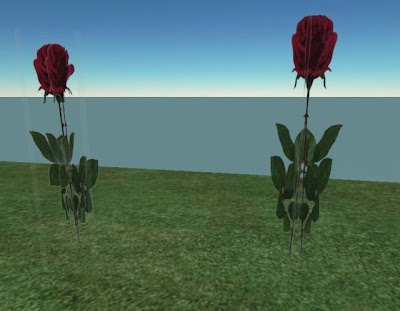
Plants are everywhere in Second Life, from the free Linden made plants everyone can place to the beautiful creations in Svarga. The complex plant life in Svarga takes some serious building skills, but it's not very difficult to make a simple, texture based plant. Done well, these can look very realistic, especially at a distance. Done poorly, they stick out like a sore green thumb. I have seen a surprising number that were done poorly, including some you have to spend your hard earned Lindens to buy. Look at the picture below. Can you tell the difference between these two roses?

Now, I didn't spend a tremendous amount of time on either of these, so neither looks all that impressive. But this is just a tutorial, and I wanted to illustrate a couple of common pitfalls. Both of these roses were made starting from the same image. The rose on the left has two problems. First, notice the whitish, translucent haze around the edges. These are the edges of the prims onto which I mapped the image of the rose. These hazy edges don't appear on the rose on the right. Second, and this is kind of hard to see here, but the is a fine white line outlining the leaves, stem, and petals of the rose on the left. Again, they don't appear on the rose on the right. This tutorial will explain what caused these problems and how to avoid them using the GIMP.

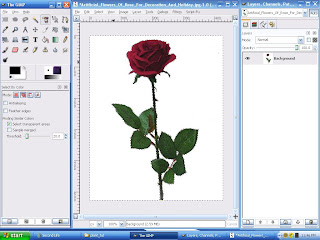
Here's the image I started with. This works best if you start with a picture of a plant on a white background. If a part of the plant has white in it, such as the flower petals,you're going to have to modify this technique a little. Try using the Magic Wand selection tool instead of the Color Selection tool as I'm about to do.


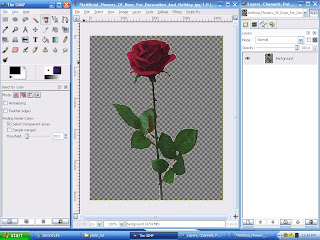
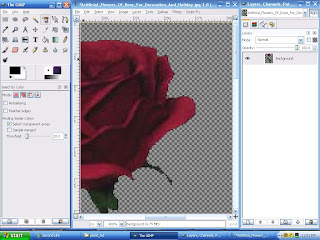
First, right click on the layer in the Layers window and select "Add Alpha Channel". Next, click on the "Select Regions by Color" button in the Gimp toolbox. For the image I used, I got the best result by setting the threshold at 20. Now, click anywhere on the white background part of the image. This will select every part of the image that has a color value within 20 percent of the color value of the pixel you clicked. Next, press Ctrl-k to clear (delete) the selection. Poof! All the white background disappears leaving only the rose against the checkerboard. Remember from the tattoo tutorial that the checkerboard is how the Gimp represents transparency.


However, we now have a problem. Again this is hard to see in the picture above, but look what we see if we zoom in.

See that white line around the rose petals? This is the white line I mentioned earlier that we could see in the final rose in Second Life. I'm not an expert on graphics, but I assume this is caused because the pixels right along the border between the rose and the white background aren't within 20 percent of the color value of the background. So they didn't get selected when we deleted the background. The good news is we can easily fix this! There are several ways to do this, but here's what has worked best for me. Undo every step back to the part where the white background is selected, but not yet deleted. Now, from the Select menu, click Grow Selection. Make sure it says 1 pixel in the window that pops up, and click on OK. This may be obvious, but this expands the selection by exactly one pixel.
Now, delete the selection as before by pressing Ctrl-k. Now zoom in and you should see this.

Yay! No white line. Save the image as a Targa file. If you don't remember how to do this, go back to the tattoo tutorial.

Start Second Life and upload the image. For the rest of this, I'm going to assume you know the basics of making prims and applying textures in Second Life. If you don't, go through the basic building tutorials at the Ivory Tower of Primitives, or check out the tutorials on Natalia Zelmanov's blog. Make sure you're somewhere you're allowed to build, and rez a cube. Apply the image of the rose (or whatever plant you uploaded) to the front and back faces of the cube.

Now, we want the other four faces of the cube (don't forget the bottom) to be transparent. You could just apply the blank texture to these faces, and then use the transparency slider in the texture tab. However, this will introduce the first problem I mentioned with the rose on the left way back at the start of the tutorial, the white hazy edge outlining the cube itself. The reason for this is that the transparency slider only goes up to 90%. You can't make it completely transparent. Thus, the white haze. This has to be the most common mistake I've seen with plants in Second Life. Again, this has an easy fix.

This doesn't apply just to making plants If you're going to build very much of anything in Second Life, sooner or later you're going to need to make the entire face of a prim 100% transparent. To do this, you need a fully transparent texture. You could make your own using the Gimp. In fact, you can probably figure that one out on your own, but it will cost you 10L to upload. Why pay that to upload nothing . . . literally. Go back over to Natalia's blog. She has a fully transparent texture as a freebie in her store in Second Life. Once you have the fully transparent texture, apply it just like you would any texture to the other four faces of your cube. Then edit the size of the cube to make it as thin as you can. Voila! You have made a plant. Oh, one other thing you should do is copy this cube, put it in the same X and Y location as the first cube, rotate it 90°, and link the two cubes together. This way, you can see the plant from any angle. Happy planting!