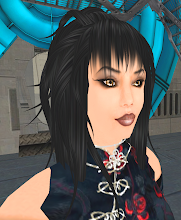
I first joined Second Life in December 2005. At the time, I couldn't manage my first life, much less take on a second one. I think I logged in only a few times and barely figured out how to move around. Almost a year later I had gotten my real life somewhat in order, and a good friend of mine talked me into giving Second Life another chance. It was because of her that I had signed up originally, and by now she was practically addicted. I couldn't remember my password or anything, so I just created a new account. For some reason, though, I just still couldn't really get into it. By January of 2007, though, I was honestly starting to feel a little left out of an important part of my friend's life. Every time we got together, she'd talk about her SL friends as if I knew them, almost forgetting that I had no idea who she was talking about. Ok, I'll admit it. I was feeling a little jealous :) . Finally, after I discovered that a couple of other friends of ours were also really into Second Life, I decided I needed to give it another chance. I'm really glad I did, because I've found it gives me a creative outlet I've never really had. It's also given me an excuse to learn some really cool software like the Gimp and Blender, and a reason to start a blog.
Anyway, the point of all of this is that I realized the other day that I would do things a lot different if I were starting Second Life now, knowing what I know. I could have saved a few dollars. Quite a few dollars, honestly. Unfortunately, I've already spent that money and I can't get it back. What I can do, however, is help other people avoid some of my mistakes.
So I've decided to try a little experiment. I'm calling it "Free Second Life". I want to see how good of an experience someone can have in Second Life without spending a single penny of real money! Yesterday, I created a new alt account. I did this so that I can make this experiment as realistic as possible. I wanted to start fresh with just the newbie inventory that Linden Labs gives you when you sign up. I'm going to post my progress here, ending with my Linden balance at the end of each day that I post. I do plan on earning some Lindens. You would be extremely limited in hat you could do without them. The rules for this experiment are:
1. I can't purchase any Lindens. I can set up a credit card so that I have payment info on file, but I can't buy any Lindens.
2. I can't transfer any Lindens from any of my other accounts to this one. I'm not giving up my other SL accounts, and I can still spend real money on them. But none of that money can end up in the hands of my Free Second Life account.
3. No begging for Lindens. I suppose this is a valid way to get a few Lindens, but I just can't do it. I've had complete strangers ask me for Lindens before, and it annoys the crap out of me.
4. No accepting of gifts of Lindens from friends of my other alts. I just think that would be cheating.
5. No accepting of of Lindens gifts from people who read this blog.
6. Gifts of clothes, objects, other items, and Lindens freely given to me in world by people in was that don't violate riles 3, 4, or 5 will be accepted. I think this is realistic. I've had people give me gifts before for various reasons, and I don't see a problem with that as long as I'm not going around begging for gifts or Lindens.
I think those rules are enough.
So, I created a new account. My Free Second Life name is Elsbeth McMahon. I wanted Elizabeth, but that name wasn't available with any of the current last names. I chose McMahon because it was the closest thing to my RL last name, McGough. Ok, maybe not that close. But they're both Irish.
I went through Orientation Island like all other newbies. I won't go into details of that here. I think the Orientation Island process is pretty good. The instructions they provide are fairly easy to follow. Once I finished that and got to the mainland, I tried to remember what it was like to be a newbie. To be honest, that wasn't as easy as you'd think. It's very hard to pretend you don't know what you know. At least it was for me. Maybe that's why I haven't been able to get into doing any role playing :) .
I decided the first thing I wanted to do was not look so much like a newbie. I looked pretty awful compared to the beautiful avatars you see on the Second Life home page. To get started, I consulted an expert. Natalia Zelmanov has an excellent guide for newbies on her blog. Following her suggestion, I first went to New Citizens Inc. On her blog, it's called New Citizens Plaza, but they've changed the name since she wrote her guide. When I got there, it was very crowded and extremely laggy. This is, unfortunately, not uncommon for some of the mainland sims. If you are new (or even if you aren't) and find yourself somewhere where everything is taking a long time to rez into view, and you can barely move, try not to get frustrated. Each sim (also known as a region) on the mainland is an area of 65,536 square meters and is hosted on it's own server. Some servers are faster than others, and each can only handle a certain number of people in it at the same time. I think the number is 40. Anyway, crowded sims mean a full server. And this means slow. You have two choices. Be patient and accept that it's going to be slow, or go somewhere else. I have very little patience. I opted to go somewhere else.
I went to Free Dove. I so wish I had known about this place when I really was a newbie. The place is loaded with free clothes, shoes, hair, skins, and a lot of other stuff. It was very crowded, but not laggy. I guess it's on a faster server, I don't know. Anyway, I picked up almost everything there for the taking. A couple of the skins there are actually quite nice. And I was able to find a nice, normal looking casual outfit that didn't make it overly obvious that I was a newbie. I didn't really like any of the hair I got there, though.
Oh, another thing. I think there were some shapes there, but you don't really even need a freebie shape. All of the shapes you can buy (or pick up for free) are created using the slider bars under the Edit Appearance menus. You hopefully remember how to change those from learning about it in Orientation Island. I was able to use these to make my own shape that I think looks quite nice fairly easily. I may post a detailed blog about that tomorrow.
That was pretty much it for day one of Free Second Life for Elsbeth McMahon. My Linden balance at the end of the day was zero.
Wednesday, June 13, 2007


Friday, June 8, 2007
Making a Simple Plant
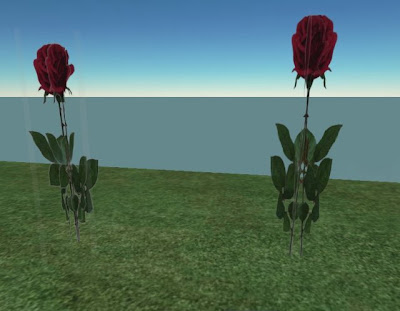
Plants are everywhere in Second Life, from the free Linden made plants everyone can place to the beautiful creations in Svarga. The complex plant life in Svarga takes some serious building skills, but it's not very difficult to make a simple, texture based plant. Done well, these can look very realistic, especially at a distance. Done poorly, they stick out like a sore green thumb. I have seen a surprising number that were done poorly, including some you have to spend your hard earned Lindens to buy. Look at the picture below. Can you tell the difference between these two roses?
Yay! No white line. Save the image as a Targa file. If you don't remember how to do this, go back to the tattoo tutorial.
Now, I didn't spend a tremendous amount of time on either of these, so neither looks all that impressive. But this is just a tutorial, and I wanted to illustrate a couple of common pitfalls. Both of these roses were made starting from the same image. The rose on the left has two problems. First, notice the whitish, translucent haze around the edges. These are the edges of the prims onto which I mapped the image of the rose. These hazy edges don't appear on the rose on the right. Second, and this is kind of hard to see here, but the is a fine white line outlining the leaves, stem, and petals of the rose on the left. Again, they don't appear on the rose on the right. This tutorial will explain what caused these problems and how to avoid them using the GIMP.
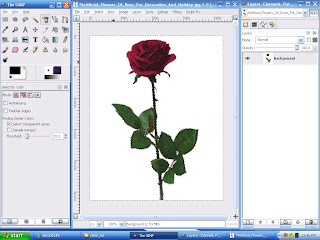
Here's the image I started with. This works best if you start with a picture of a plant on a white background. If a part of the plant has white in it, such as the flower petals,you're going to have to modify this technique a little. Try using the Magic Wand selection tool instead of the Color Selection tool as I'm about to do.
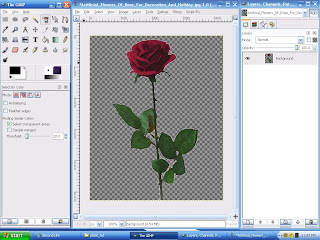
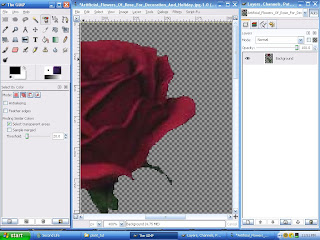
First, right click on the layer in the Layers window and select "Add Alpha Channel". Next, click on the "Select Regions by Color" button in the Gimp toolbox. For the image I used, I got the best result by setting the threshold at 20. Now, click anywhere on the white background part of the image. This will select every part of the image that has a color value within 20 percent of the color value of the pixel you clicked. Next, press Ctrl-k to clear (delete) the selection. Poof! All the white background disappears leaving only the rose against the checkerboard. Remember from the tattoo tutorial that the checkerboard is how the Gimp represents transparency.
However, we now have a problem. Again this is hard to see in the picture above, but look what we see if we zoom in.
 See that white line around the rose petals? This is the white line I mentioned earlier that we could see in the final rose in Second Life. I'm not an expert on graphics, but I assume this is caused because the pixels right along the border between the rose and the white background aren't within 20 percent of the color value of the background. So they didn't get selected when we deleted the background. The good news is we can easily fix this! There are several ways to do this, but here's what has worked best for me. Undo every step back to the part where the white background is selected, but not yet deleted. Now, from the Select menu, click Grow Selection. Make sure it says 1 pixel in the window that pops up, and click on OK. This may be obvious, but this expands the selection by exactly one pixel.

Yay! No white line. Save the image as a Targa file. If you don't remember how to do this, go back to the tattoo tutorial.
Start Second Life and upload the image. For the rest of this, I'm going to assume you know the basics of making prims and applying textures in Second Life. If you don't, go through the basic building tutorials at the Ivory Tower of Primitives, or check out the tutorials on Natalia Zelmanov's blog. Make sure you're somewhere you're allowed to build, and rez a cube. Apply the image of the rose (or whatever plant you uploaded) to the front and back faces of the cube.
Now, we want the other four faces of the cube (don't forget the bottom) to be transparent. You could just apply the blank texture to these faces, and then use the transparency slider in the texture tab. However, this will introduce the first problem I mentioned with the rose on the left way back at the start of the tutorial, the white hazy edge outlining the cube itself. The reason for this is that the transparency slider only goes up to 90%. You can't make it completely transparent. Thus, the white haze. This has to be the most common mistake I've seen with plants in Second Life. Again, this has an easy fix.
This doesn't apply just to making plants If you're going to build very much of anything in Second Life, sooner or later you're going to need to make the entire face of a prim 100% transparent. To do this, you need a fully transparent texture. You could make your own using the Gimp. In fact, you can probably figure that one out on your own, but it will cost you 10L to upload. Why pay that to upload nothing . . . literally. Go back over to Natalia's blog. She has a fully transparent texture as a freebie in her store in Second Life. Once you have the fully transparent texture, apply it just like you would any texture to the other four faces of your cube. Then edit the size of the cube to make it as thin as you can. Voila! You have made a plant. Oh, one other thing you should do is copy this cube, put it in the same X and Y location as the first cube, rotate it 90°, and link the two cubes together. This way, you can see the plant from any angle. Happy planting!
Tuesday, June 5, 2007
Who Am I?
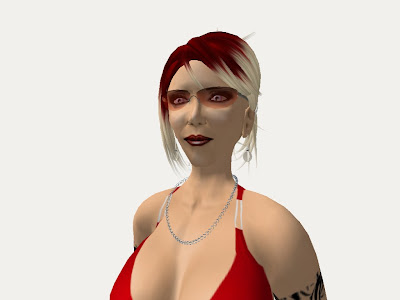
I just realized I haven't mentioned my SL name here yet. Dani is my name in RL, but in SL I have a different name. I don't know why. I actually have a couple of alts, but I spend most of my time in SL as Sera Spitteler. And Sera's less than evil twin is Salina Taurog. Salina is the pale one who likes purple. They are both me, and we are all very happy right now living inside one RL body, and several SL avatars. :)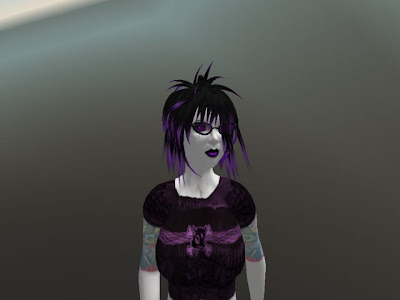


Tuesday, May 29, 2007
Windlight
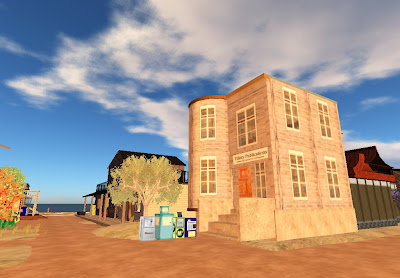
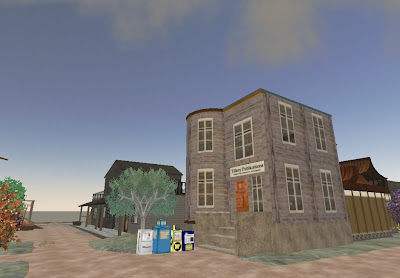
Just a quick post to say that I downloaded the new First Look Viewer today to check out the new Windlight feature . . . and it is amazing. I tried to go to Svarga to take some snapshots to show here, but some guy there wouldn't leave me alone. It figures. Usually, I would like to meet more people in world and no one says boo to me. Tonight I wanted to be left alone. So I went to Washtown and took two quick snapshots. One n the new viewer with WindLight, another from the same location in the regular viewer.
 Oh, I also updated the earlier tattoo tutorial blog. The method I had originally worked fine, but I figured out a small improvement.
Friday, May 25, 2007
Furry Monkey
As a disclaimer, let me first state that I am not a furry. There are a lot of furries in Second Life, though, and many of them look amazing. While I don't pretend to understand the whole furry fandom thing, I do have an affinity for cats and monkeys. So, awhile back I decided to buy a furry avatar just to try it out. The cat was easy. Nearly every furry avatar vendor in Second Life has cats. Big cats, little cats, purple cats, and pink cats. I ended up buying two completely different looking tiger avatars. One was purple, because . . . well, I like purple :) The other was red and black and a little scarier looking. I don't use them often, but I do like the look.
What I really wanted, though, was a monkey. I have been to every furry avatar vendor I could find, and no one has a monkey. I did find a chimp . . . but a chimp is NOT a monkey. I did a little research on the furry fandom in RL, and discovered that monkeys and apes are almost unheard of in that lifestyle. Apparently because they're primates and humans are primates. So I suppose the thought is that monkeys are too close to human to be worthy of being furries? Have you ever seen a picture of a tamarin or a marmoset? Not very close to human. I don't understand, but as I said I'm not a furry. I don't intend any disrespect to anyone, I just really don't understand. If anyone can explain it to me, I would appreciate it.
Also, I really, really want a cotton top tamarin avatar. I am not yet a talented enough builder or texturer to make it myself. I guess that gives me a goal to work towards. 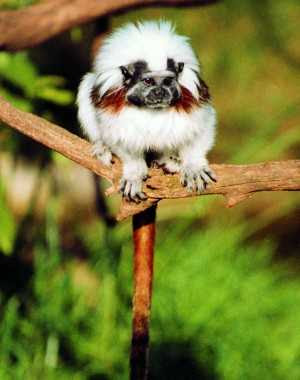
Friday, May 18, 2007
Funky Fractal Dress
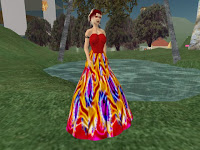
I made a dress I really like, although most people will probably think it's a little . . . well, loud I guess. I was messing around with fractal patterns in Gimp, and came up with a pattern I thought would make a good dress. You be the judge.
Saturday, May 12, 2007
The McGough Clan
Ok, this blog is supposed to be about my first life too, and all I've posted about so far is Second Life. It's almost 1 in the morning, my cat has the midnight crazies, and I can't sleep. I can't think of a better time to post about my first life :)
I have an uncommon last name. McGough. Its pronounced kinda like "mug you" . . . more or less. It is NOT pronounced like the blind cartoon character, Mr. Magoo. But most people pronounce it that way. I usually correct them, but I have devloped a sense of humor about it, as you can see by the URL for this blog.
One of the nice things about having an uncommon last name is tracing your geneology. I haven't ever done any geneology research, mainly because I didn't have to. My parents and grandparents did all that, I think, or maybe it all just kept getting passed down from generation to generation. Either way, I've known the names of my ancestors who first came to America for about as long as I can remember. Robert and Sarah Matilda Carson McGough. Some sources say er name was Mary instead of Sarah. Whatever . . . they came here in 1773, so a little confusion over a first name is understandable.
There are a couple of excellent websites covering McGough history. If you're a geneology buff (or a McGough) check them out.
www.magoo.com
www.clan-mcgough.com
The first one was created by Hugh McGough, who I am probably only very distantly related to. The second one is by Edward McGough, who is a less distant cousin, although I don't know exactly how we're related.
I have an uncommon last name. McGough. Its pronounced kinda like "mug you" . . . more or less. It is NOT pronounced like the blind cartoon character, Mr. Magoo. But most people pronounce it that way. I usually correct them, but I have devloped a sense of humor about it, as you can see by the URL for this blog.
One of the nice things about having an uncommon last name is tracing your geneology. I haven't ever done any geneology research, mainly because I didn't have to. My parents and grandparents did all that, I think, or maybe it all just kept getting passed down from generation to generation. Either way, I've known the names of my ancestors who first came to America for about as long as I can remember. Robert and Sarah Matilda Carson McGough. Some sources say er name was Mary instead of Sarah. Whatever . . . they came here in 1773, so a little confusion over a first name is understandable.
There are a couple of excellent websites covering McGough history. If you're a geneology buff (or a McGough) check them out.
www.magoo.com
www.clan-mcgough.com
The first one was created by Hugh McGough, who I am probably only very distantly related to. The second one is by Edward McGough, who is a less distant cousin, although I don't know exactly how we're related.
Subscribe to:
Posts (Atom)